Secure your AWS account#
After you've got your account set up and you're logged into your "Root user" account, it's time to secure everything and prevent getting a massive bill like the ones we've seen above.
To achieve this, we have to do the following things:
- Log into our root IAM user
- Add Multi-Factor Authentication (MFA)
- Create a billing alarm across the entire account
- Create a new IAM user that isn't the
rootuser - Ensure the new user has MFA setup
- Ensure the new user can only access IAM, which will be made more clear soon
These simple tasks are going to help prevent your account being compromised. They will also help prevent expensive services from being created on your account.
Warning
This is going to be a big section of the course, but also a critical one. I highly recommend you go through this entire section in one sitting and as soon as possible. Don't skip this.
So login to your new account as the root user and let's begin.
Head over to https://signin.aws.amazon.com/ to get started.
Add MFA to the root user#
Now we need to update your root account to use an MFA device. This is a second form of authentication. The reasons this is important is simple: a password is something you know, and an MFA device is something you have. No one else will have your MFA device, which is very likely going to be your phone in this case. Now an attacker needs both what you know, your password, and what you have, your phone.
On your mobile phone, download the Microsoft Authenticator. The reason I recommend this particular athenticator is because it can backup your codes to Microsoft's network, allowing you to change devices (which might occur if yours is lost or stolen.) The common choice, Google Authenticator, doesn't allow you to do this (at the time I'm writing this.)
You can get information on the Microsoft Authenticator over on their website. You'll need a Microsoft account to take advantage of backups, which I strongly recommend.
Just like the password process, AWS also has the MFA process documented too. Very well documented. Head over to https://docs.aws.amazon.com/IAM/latest/UserGuide/id_credentials_mfa_enable_virtual.html and get your MFA token setup as soon as possible.
After this is done, the root account is way more secure at this point. There's more you can do, but that's very sufficient for now.
Create a billing alarm#
When you're creating resources, it can be easy to forget you created something. This can lead to an AWS bill that you weren't expecting. To help prevent this from happening you can create an AWS billing alarm. This will alert you once a certain threshold is reached, such as $10 or $100.
Note
You'll have to perform these actions as the root user.
Like all AWS processes, they've documented billing alarms very well. I won't repeat it here. Head over to https://docs.aws.amazon.com/AmazonCloudWatch/latest/monitoring/monitor_estimated_charges_with_cloudwatch.html#turning_on_billing_metrics and go through the instructions.
I recommend creating multiple billing alarms to cover a range of thresholds. Don't trust yourself to remember to delete resources - do this now.
Create a new IAM user#
When you're working with your AWS account on a daily basis, you don't want to use the root account. You want to a daily, standard account instead. This helps protect your account and it also means you can't make a mistake and do something destructive or expensive (because the root account can do anything.)
Creating a non-root user is standard practice, and we're going to be doing that, but in a slightly different way than what you'll see day to day.
We'll create a user that can manage all of our IAM resources for us, including new users, but nothing else (like EC2 or RDS.) That way, we can use this user to setup other, more pivileged users that we'll use once and then delete. We're learning here, don't forget. This isn't a long-lived account you're working with. It's a short-lived, learning account, so none of the resources, including IAM resources, should survive past your journey though this book and our other books.
Let's now create that new user. We're going to create a new user called iam-admin who can only manage IAM related resources, as I explained above. We'll have a stolid password, of course, and MFA enabled.
Logged into the AWS Console as the root user, goto the IAM service:
- Create a new user called
iam-admin - Select the
Passwordoption for "Select AWS credential type" - Use
Autogenerated passwordunder "Console password" (you'll save this later) - Untick the
User must create a new password at next sign-inbox, as the autogenerated password is fine - Click
Next: Permissions
Now we're going to attach an AWS managed policy. Over on the right, you'll see a box that says "Attach existing policies directly". Select this. Here's what you'll see:
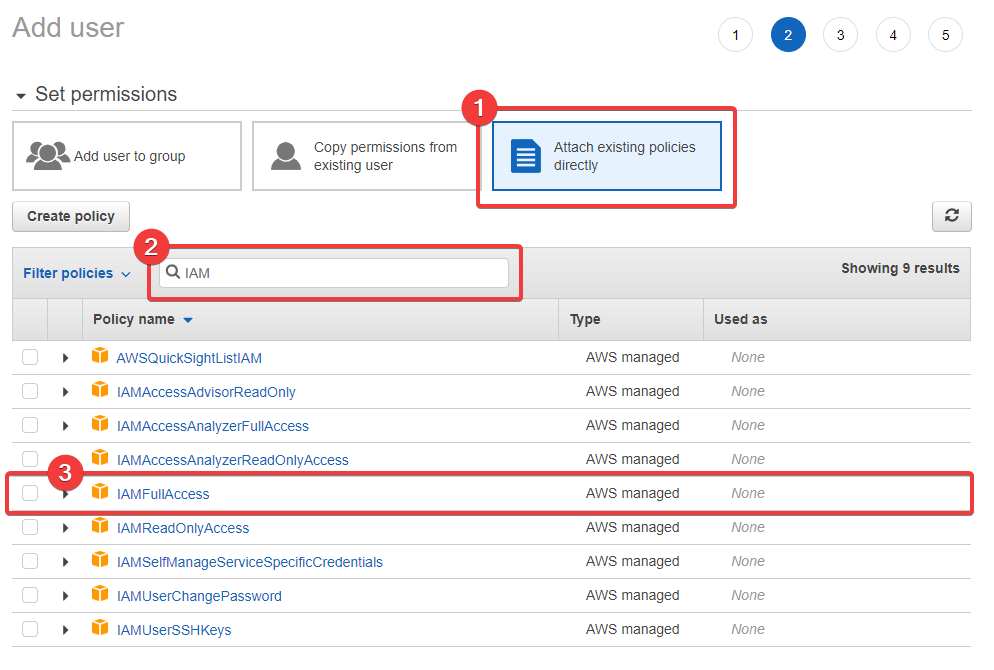
Point 1 is where the option is, point 2 is the search field which you can use to type iam and quickly find the policy we need, and point 3 is the managed policy we're going to attach. So select IAMFullAccess policy and click Next: Tags.
We'll skip adding tags for now and continue to Next: Review. Here is the permissions summary I get:
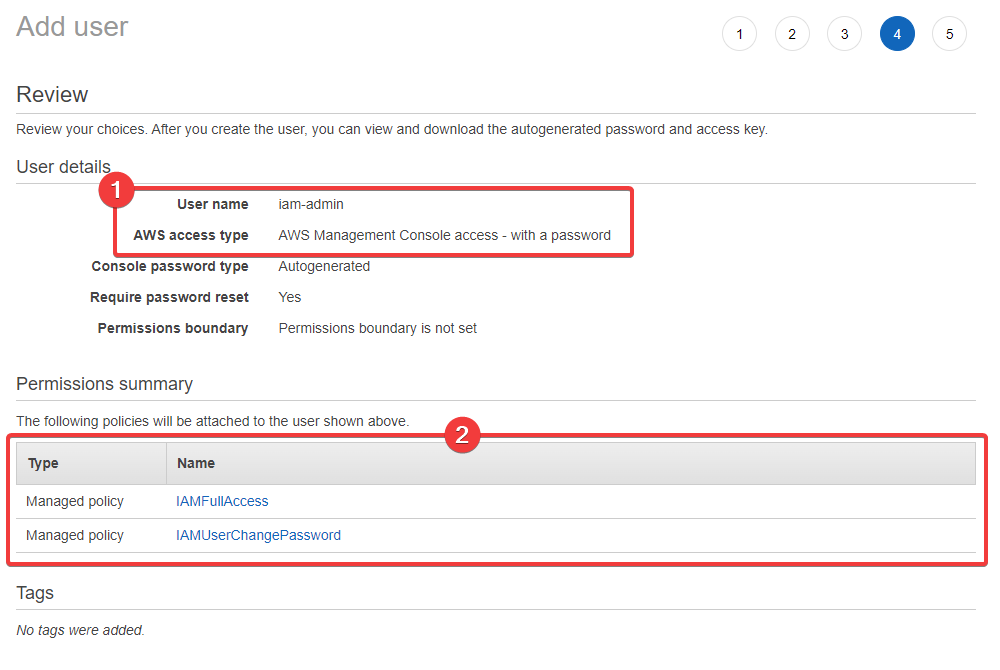
- You can see our username is
iam-adminand we have console access, but not programmatic (API) access - You can also see we have IAM permissions and nothing else
Click Create user. Now you have one chance to copy the user's autogenerated password. Click the Show link next to the password and copy the password into your password manager:
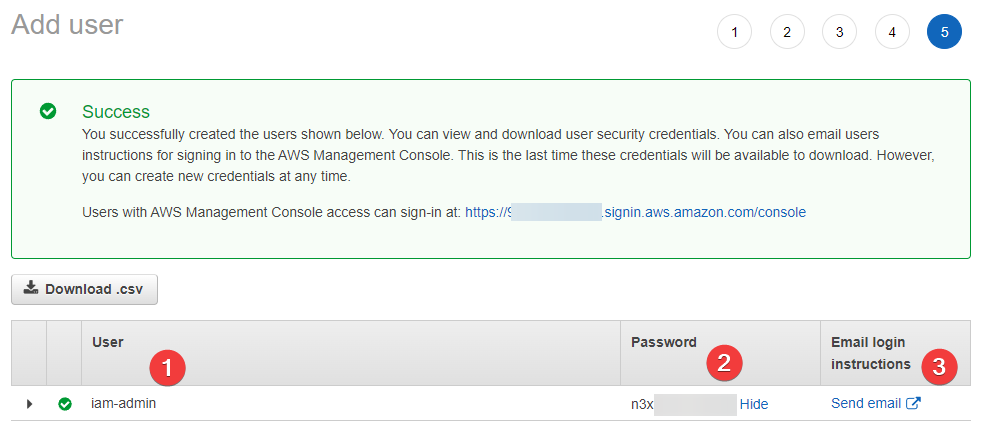
- Our username, as we expect it to be
- The password AWS has generated for us
- And the
Send emailoption, which I ignore as I consider sending this information via email insecure
Now we have a new user! Let's review them in the console.
Our new user#
When you visit the Users section of the IAM console, you'll see our new user in the list:
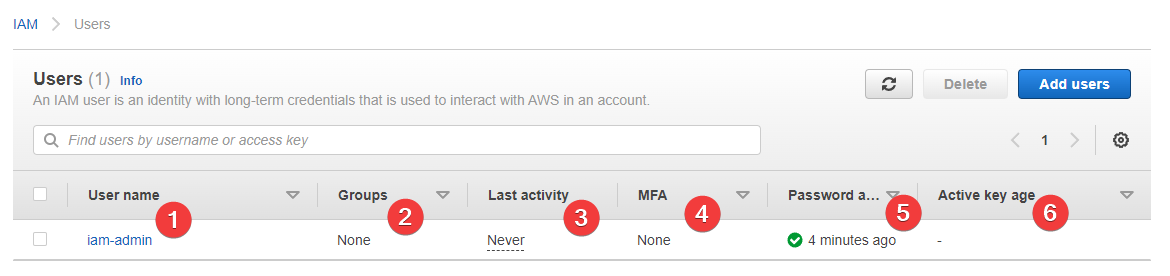
- The username we just selected
- Our user is in no groups at this point in time
- We've never logged into this user, but that's about to change
- We have no MFA enabled - we'll change soon
- Their password is only four minutes old, because I just created the account
- And they don't have API keys, so this field is blank
And we're done.
Logging in#
Finally, we can login to our account using our new user. Follow this process:
- Logout from the root account
- Click "Log back in" on the page you're taken to
- Select "IAM user" from the list and key in the account ID you copied earlier
- Enter the username
restricted-user(or whatever you used) - Enter the password generated for you by AWS
And just like that, you're logged into your (highly) restricted user account which we can safely use to continue learning.
Multi-Factor Authentication (again)#
There's just one more thing we have to do: set up MFA. You've already done this on the root account, so repeat the process again. Don't skip this! Even though this user can only manage IAM related resources, think about this: it can create another user with virtually unlimited access to your account, so it's almost as powerful as the root user, but not quite.
Secure your account!