Security Groups (SG)#
Security Groups (SG) are like little firewalls you define and attach to resources inside of AWS. They're used to define a series a rules that act like a list of permissions:
- "This traffic can come in"
- "That traffic is not allowed"
- "The EC2 Instance can send traffic out to that IP"
And so on. This list can be attached to a resource such as EC2 Instances, RDS databases, ALBs, and more. Those rules then apply to that resources and come into effect immediately.
For example, if you've got an EC2 Instance and you want to only allow TCP/443 traffic (commonly used for HTTPS), then a SG that permits TCP/443 will block everything else but that traffic to TCP/443. If you want to also allow TCP/22 (SSH), then you'd add that rule to the SG and it would immediately be permitted for all resources the SG is attached to. That SG would then allow both TCP/443 and TCP/22.
By default, SGs are created with a rule that ALLOWs all outbound traffic. This rule can be removed if you want to tightly control outbound access, which in some cases is a very good idea, but is often not required.
SGs cannot be configured with DENY rules, only ALLOW rules. That's because unless you explicitly allow/permit something it's automatically denied. This applies to both inbound and outbound traffic and is similar to how IAM works, except in this case it's simply: DENY, ALLOW (it's denied unless something explicitly allows it.)
SG's are also statefule firewalls. This means if a resource "behind" an SG makes an (allowed) outbound connection, the inbound response is ALLOW-ed through the SG regardless of inbound rules. The reverse is also true: an (allowed) inbound connection can be responded to by the resource via an outbound connection, regardless of the outbound rules. This is called a stateful connection, which means the SG "remembers" the direction of the traffic and, provided it was permitted in one direction, the response is "remembered" and allowed back in via the opposite direction.
When a resource has multiple SGs attached to it, they're all merged into a single list and the moment a single rule in that larger, merged list permits the traffic, evaluation stops and the connection is allowed. If no rule is found, the connection is denied (imagine there is a hidden "deny all" at the bottom of every SG.)
There is also a cool trick you can do that make SGs scale really, really well: you can add a rule to a SG that permits traffic from or to another SG. Not from or to another IP, but an actual SG ID. We'll look at an example of this when we come to the project work.
Visualisation#
Let's start visualising SGs and traffic flows. Here's an example network with some resources inside of it:
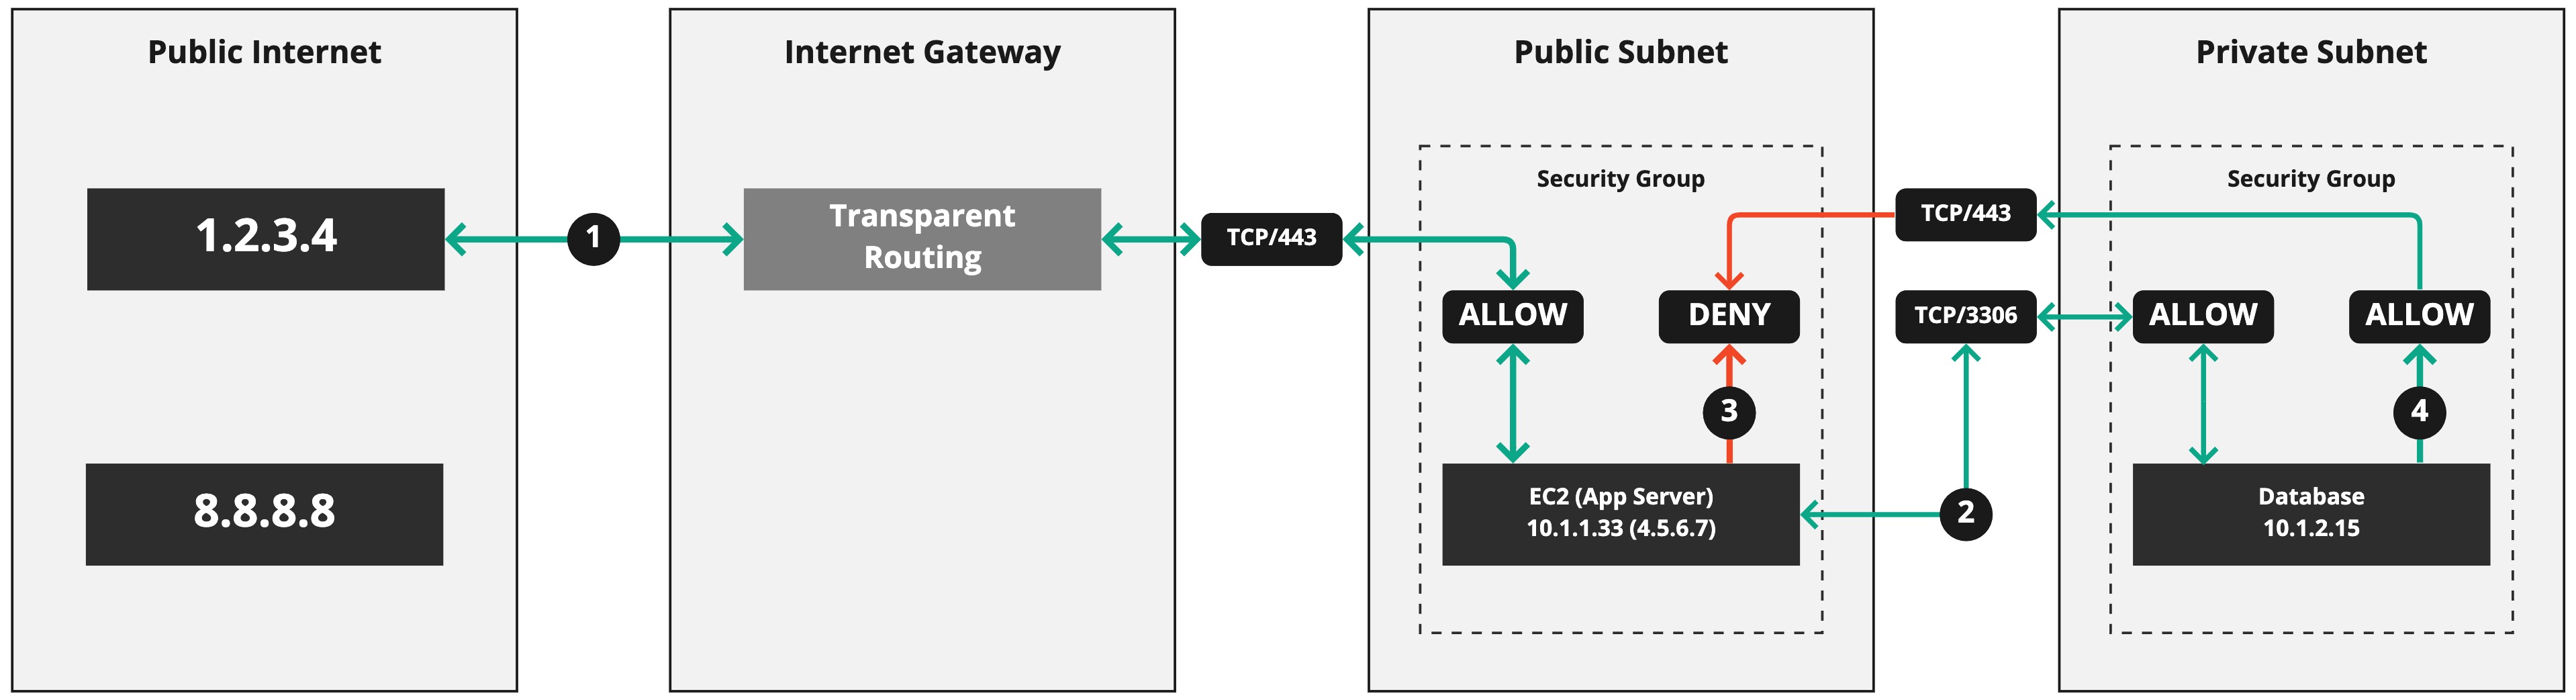
I want to break these down and explore the four connections being made here. I'll list each connection as a table of properties, and then we'll explain what's happening. I've opted for this format as it's common to find lists of firewall rules in this manner, although it's not overly common to find explanations as to what they do or what they're for. You'll have to work that out for yourself.
Connection 1#
| From | To | Protocol | Port | Result |
|---|---|---|---|---|
1.2.3.4 | 4.5.6.7 | TCP | 443 | ALLOW |
This is a client connection from a web browser that's requesting an HTTPS service from us. It's routed to the IGW and eventually reaching the SG, which ALLOWs the connection to the EC2 Instance, which has the EIP 4.5.6.7 attached to it. Notice how the arrow I've used is double-headed? It goes in both directions. That's because the response from the EC2 Instance has to be sent back to the client at 1.2.3.4. SGs are stateful, so they automatically ALLOW the return traffic from the EC2 Instance to the client.
Connection 2#
| From | To | Protocol | Port | Result |
|---|---|---|---|---|
10.1.1.33 | 10.1.2.15 | TCP | 3306 | ALLOW |
Here we see that the EC2 Instance, which runs a dynamic application, is making a connection to the MySQL database in response to the connection made by the web browser. This connetion line is also a double-headed arrow because the connection is ALLOW-ed in both directions. The SG on the Database is ALLOWing the connection from 10.1.1.33 to TCP/3306 on the Database (and back again, as it's stateful.)
Connection 3#
| From | To | Protocol | Port | Result |
|---|---|---|---|---|
10.1.1.33 | ?.?.?.? | ? | ? | DENY |
Note
This isn't an actual rule we can create. You can only create ALLOW rules, but DENY is the default behaviour when an ALLOW rule isn't present. I just want to demonstrate that behaviour.
This is a suspicious connection. It's being DENY-ed by the SG as it's not in response to an existing, related connection. It's possible this is a malicious connection trying to talk to a remote server, perhaps to download something nasty. It was blocked by the SG, as a default behaviour, because there is no ALLOW rule to explicitly permit it.
Connection 4#
| From | To | Protocol | Port | Result |
|---|---|---|---|---|
10.1.2.15 | 10.1.1.3 | TCP | 443 | DENY |
This is the Database trying to connect to TCP/433 on 10.1.1.33 (also odd behaviour), but this too is DENY-ed. The SG on the "App Server" only ALLOWs TCP/443 from the public Internet and not other, internal systems.
Summary#
So that is what SGs are doing for us: they're providing a layer between network connections and the resources that accept and process the data across those network connections. We can use them to control access outside of the operating system of the resource in question. This means if you have a process listening on TCP/80 on a Ubuntu based EC2 Instance, but a SG blocks TCP/80, then that process will never receive traffic from the network, but it can get traffic on the server's local loopback address 127.0.0.1.
Creating Security Groups#
Let's use the console to create some SGs.
IAM permissions#
Because we gave our cloud-admin user the NetworkAdministrator managed policy, we have the permissions we need to create Security Groups.
Creating the Security Groups#
Note
We're not going to attach these Security Groups to anything (yet.)
Logged into the console, go to the EC2 section of the console and under, "Network & Security", select "Security Groups":

- This is the menu section we're interested in
We'll create two security groups that include several rules, and then we'll explore a special use case for SGs. One group will be called our-learning-sg-https and include inbound rules for HTTPS and HTTP. We'll create a second SG called our-learning-sg-mysql and incliude an inbound rule for MySQL.
Let's define the rules for each SG.
For our our-learning-sh-https SG:
| From | Protocol | Port | Result |
|---|---|---|---|
0.0.0.0/0 | TCP | 443 | ALLOW |
0.0.0.0/0 | TCP | 80 | ALLOW |
And for the our-learning-sg-mysql SG:
| From | Protocol | Port | Result |
|---|---|---|---|
10.1.1.0/24 | TCP | 3306 | ALLOW |
Note
It doesn't actually matter what the CIDR range is for the MySQL SG because it's never actually going to be used. I've just gone with a simple /24 to demonstrate the use of an internal, private IP range as opposed to the allow-all 0.0.0.0/0.
These are basic rules mainly just designed to give us something to work with. Now let's create the SGs.
Click the "Create security group" button in the top-right of the screen. Here's how I've filled out the basic details of the first SG:
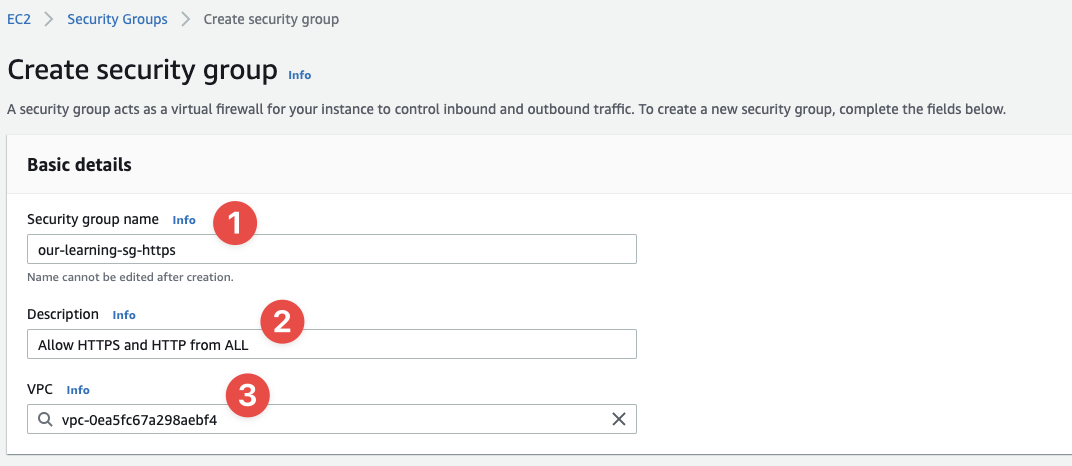
- The name of our SG:
our-learning-sg-https - This should explain the use case for the SG
- And you select the VPC the SG exists inside of - this is the VPC we created earlier
Now let's add an inbound rule. Under the heading, "Inbound rules", click "Add rule". Let's review each field as you see it because there are some shortcuts you can take:
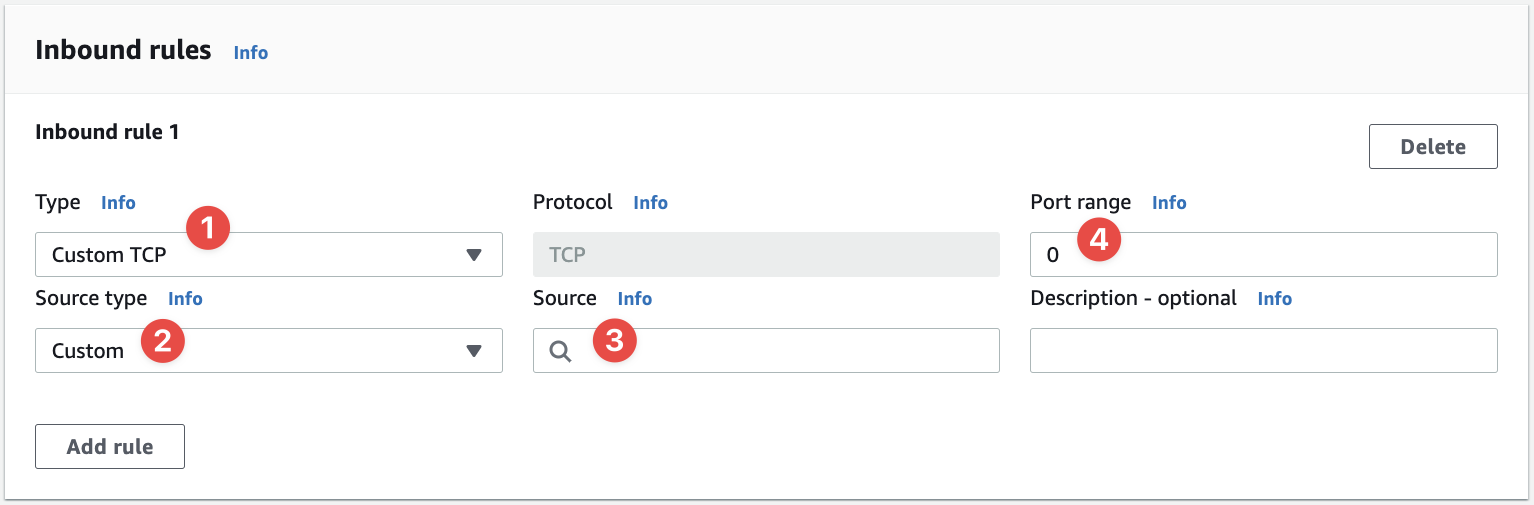
- The "Type" starts with "Custom TCP". This is where you define the traffic's charactistics quickly and easily using a shortcut, or in the default case "Custom TCP", you can define your own custom rule
- The "Source Type" let's you quickly setup a common use case, such as
Anywhere-IPv4, which means the connection is allowed from anywhere in the whole IPv4 address space (including the public Internet) - The "Source" is the literal source IP address of the traffic, which is filled in for you if you choose an option from "Source Type"
- And the "Port range" is the port or ports (or range of ports) you're allowing via this connection
Note
We don't provide a "To" address. We only provide the "Source" of the connection attempt: where the connection is coming from. The "To" effectively takes effect when you attach the SG to a resource, as the resource is the "to".
Under the "Type" dropdown you have loads of options, including the most commonly used protocols. For example, if you select "HTTPS" in the "Type" drop down, then the "Protocol" field is changed to TCP (and greyed out to prevent editing) and the "Port range" is set to a single port of 443. If you then select Anywhere-IPv4 under "Source type", then the "Source" field is greyed out and you can see the value 0.0.0.0/0 appears underneath it (the X lets you remove it.) You should see this:
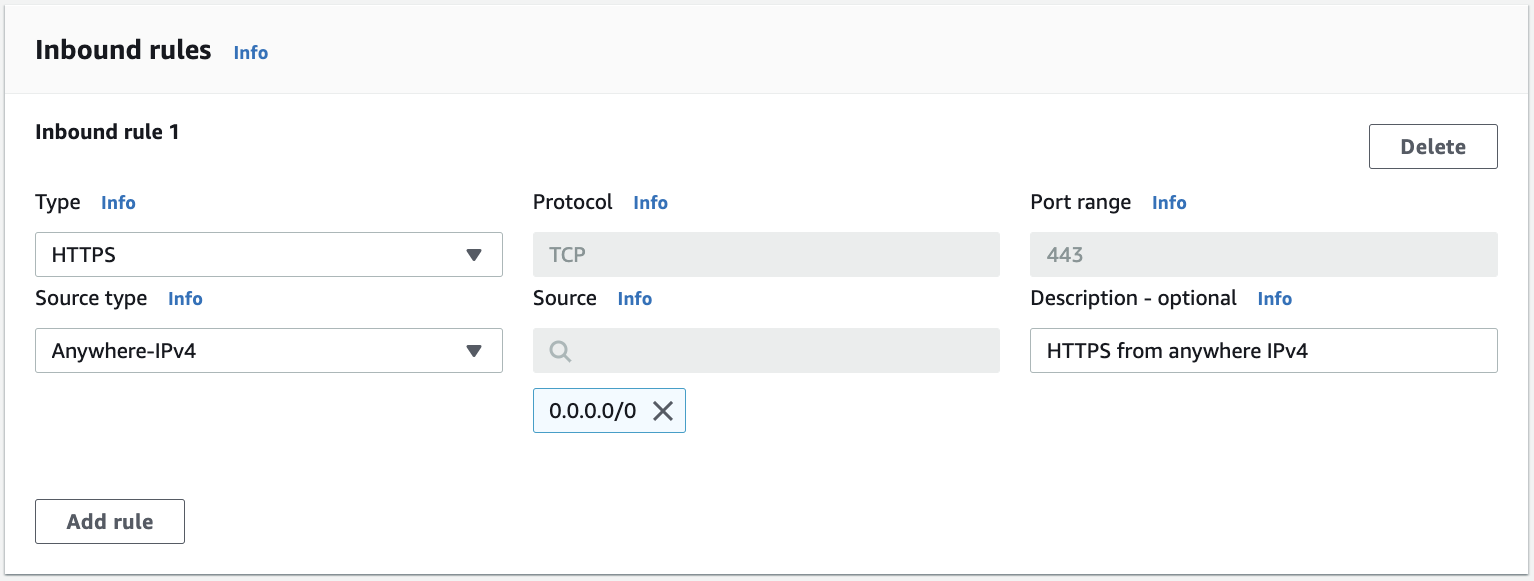
I've obviously provided the value in the "Description" field.
Note
Have a play around with the various "template" values AWS provides you in the UI. They really do make life easier, but in the long term this isn't how you'll manage SGs anyway (at least, not in a modern, well run environment.)
If we checkout the "Outbound rules" section we'll see it's identical, except instead of "Source" it's "Destination" because the traffic is outbound (going to a destination) as opposed to inbound (coming from a source.) All the concepts above apply here, too.
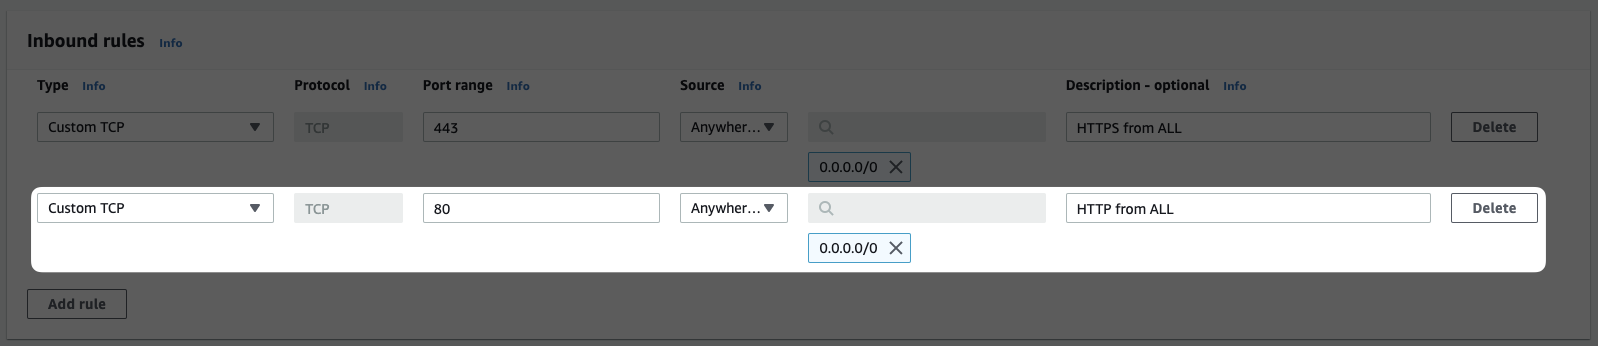
Let's create our first rule from above (without a template from AWS) and then I'll set you the task of creating the final one. Here are the rules for the our-learning-sh-https SG (again):
| From | Protocol | Port | Result |
|---|---|---|---|
0.0.0.0/0 | TCP | 443 | ALLOW |
0.0.0.0/0 | TCP | 80 | ALLOW |
And here's the first rule created in the UI:

We've used Custom TCP and Custom (Source type), set the "Protocol" to TCP (it's been set for us by Custom TCP), the "Source" has been set to 1.2.3.4/32 (the /32 essentially means a single IP), the "Port range" has been set to 443, and the "Description" has been set to something to useful.
Now add the rule for HTTP traffic based on the information in the table above. If you get really stuck, you can checkout the screenshot below.
Help!
Leave the "Outbound rules" as they are (allowing all outbound connections.)
And for "Tags", we want two:
Note
Remember, the Name tag is case-sensitive, so it has to be Name, not name.
| Key | Value |
|---|---|
Name | our-learning-sg-https |
EducationOnly | yes |
Now click, "Create security group". You'll be taken to the details page of the SG:
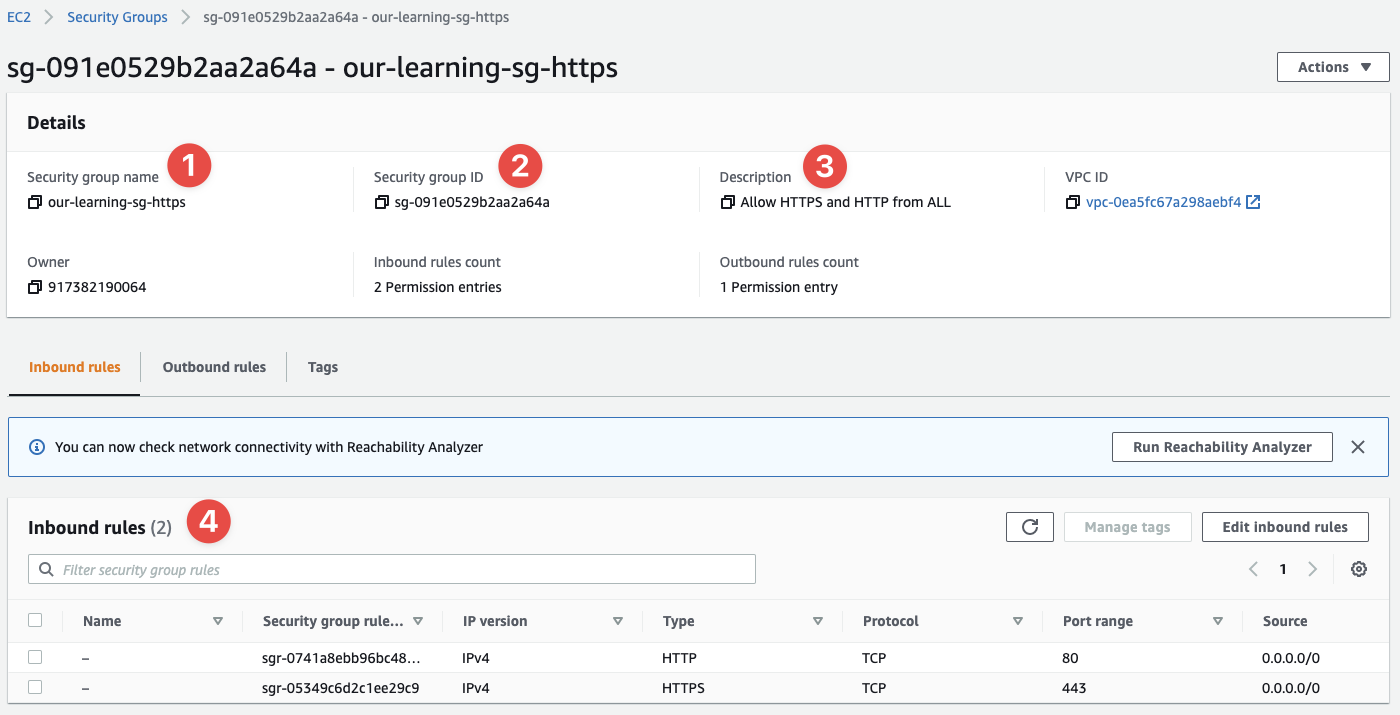
- This is the name we provided earlier
- Now we have a SG ID that we can use later in API calls and other interactions with AWS
- The description I provided earlier
- And the inbound rules we've defined (thus far)
It's now left to you, the student, to create the second SG for the (fictional) database layer. Just repeat the process from above and remember to reference the table above.
Help!
Here are the details for the MySQL SG (right-click and open the image in another tab):
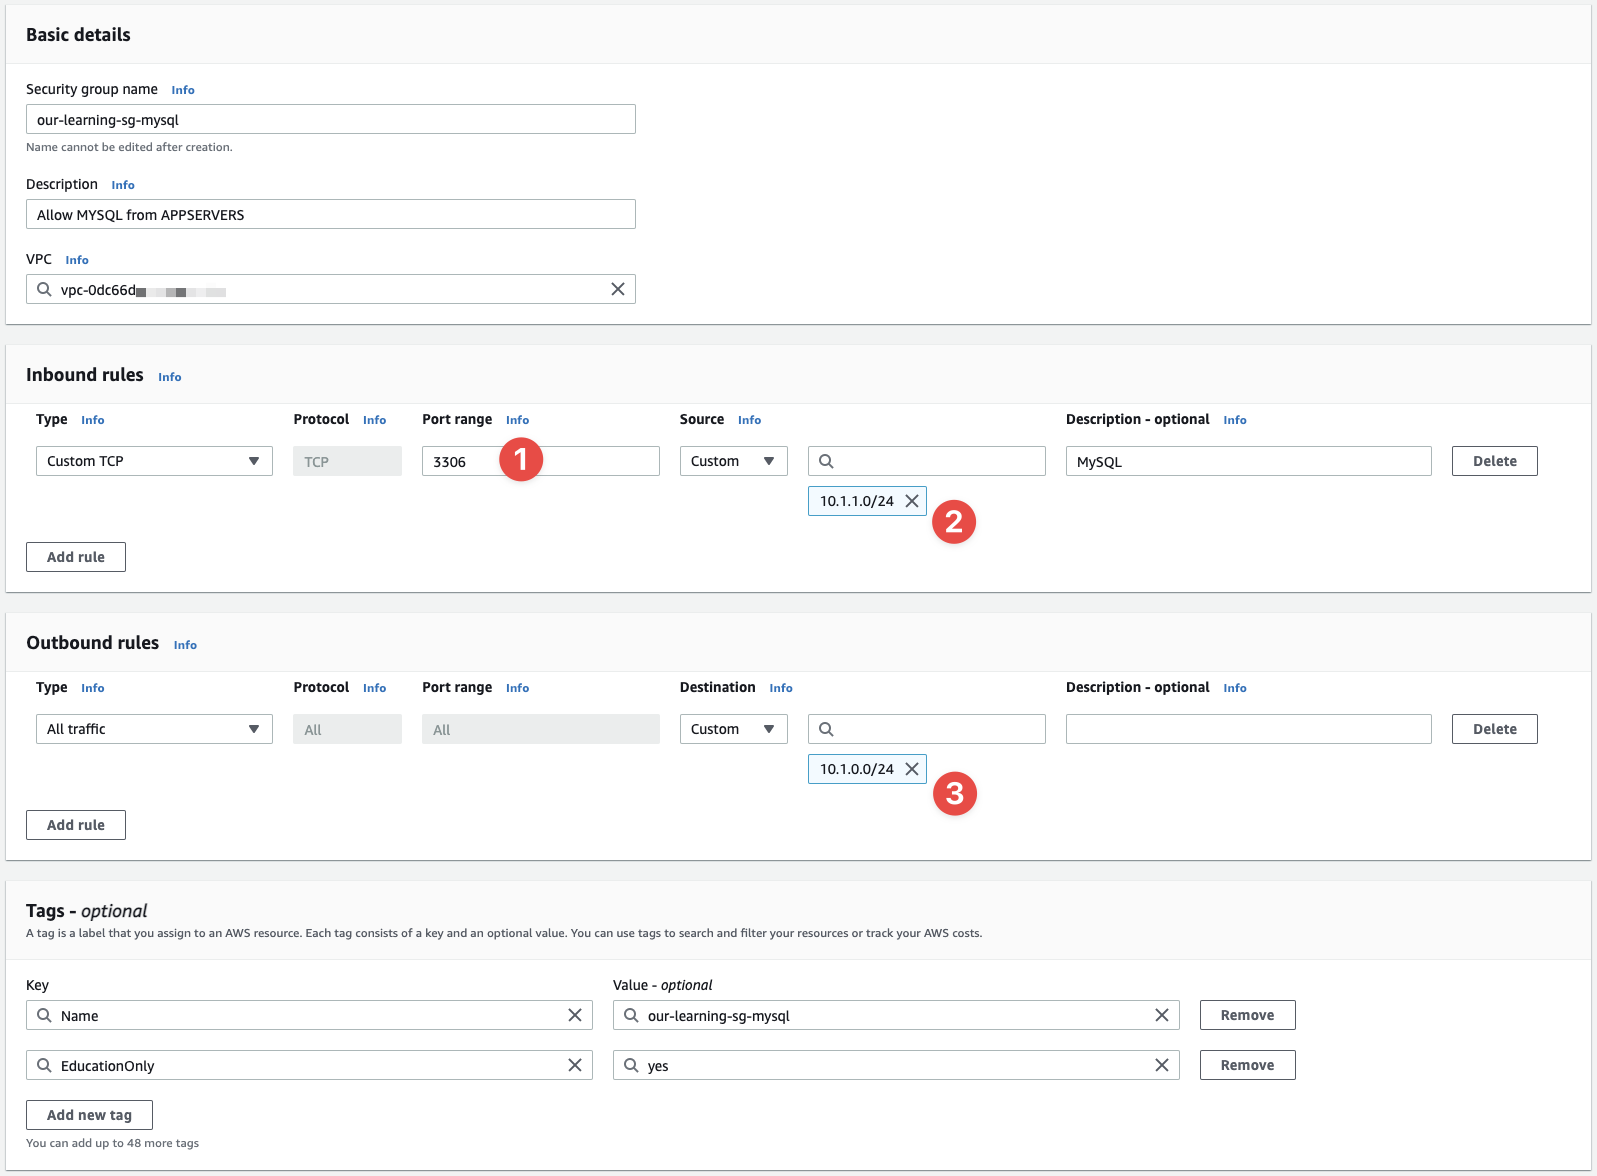
- MySQL uses
TCP/3306for connections - We only want to allow connections from the
10.1.1.0/24subnet (CIDR) - We only want to allow connections to to the
10.1.1.0/24subnet (CIDR)
SGs referencing SGs#
Now that you have both SGs, let's look at a feature that allows you to scale SGs really, really well: referring to other SGs in SG rules. That's right, instead of using IP CIDR ranges to refer to subnets and IPs that are allowed through a SG, you can allow other SG IDs through the SG.
Try it. Load up the our-learning-sg-database SG in the console and go to "Inbound rules". You should have a rule that permits TCP/3306 from 10.1.1.0/24. Delete it by clicking "Edit inbound rules":
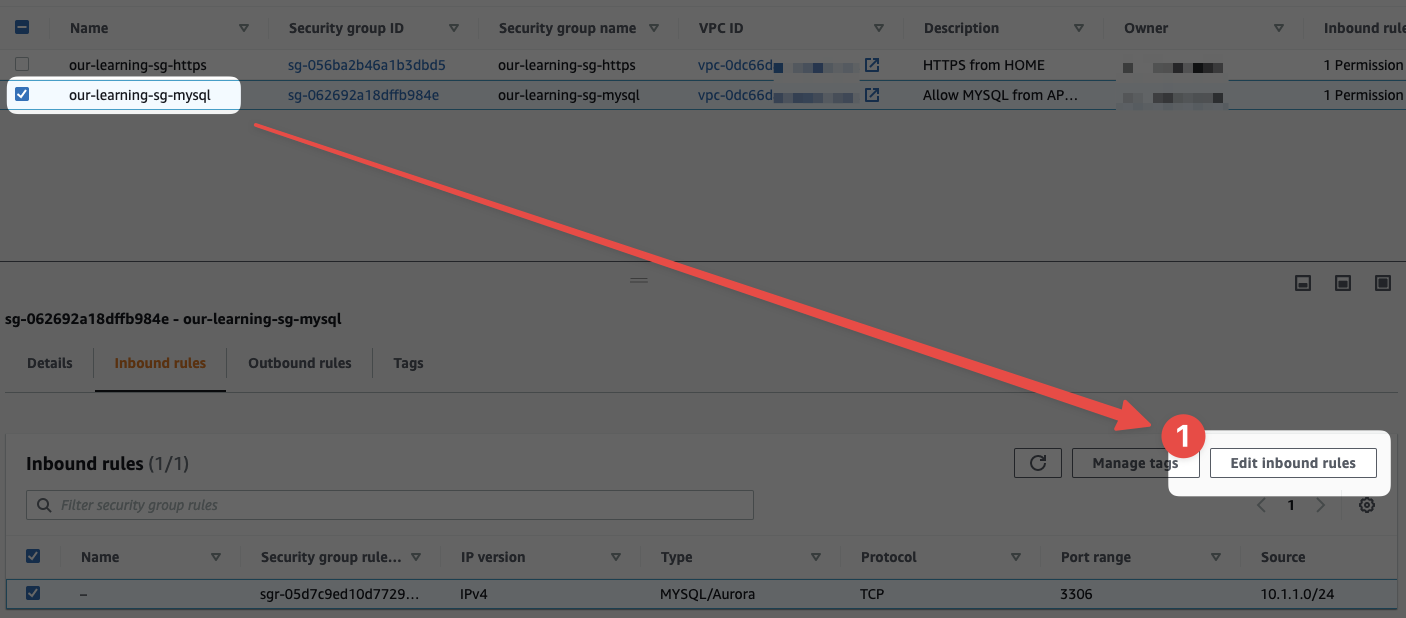
- Make sure to have the correct SG selected and then click "Edit inbound rules"
Once you're onto the next screen, we can add another rule, but this time we'll notice in the source field we can select a SG:
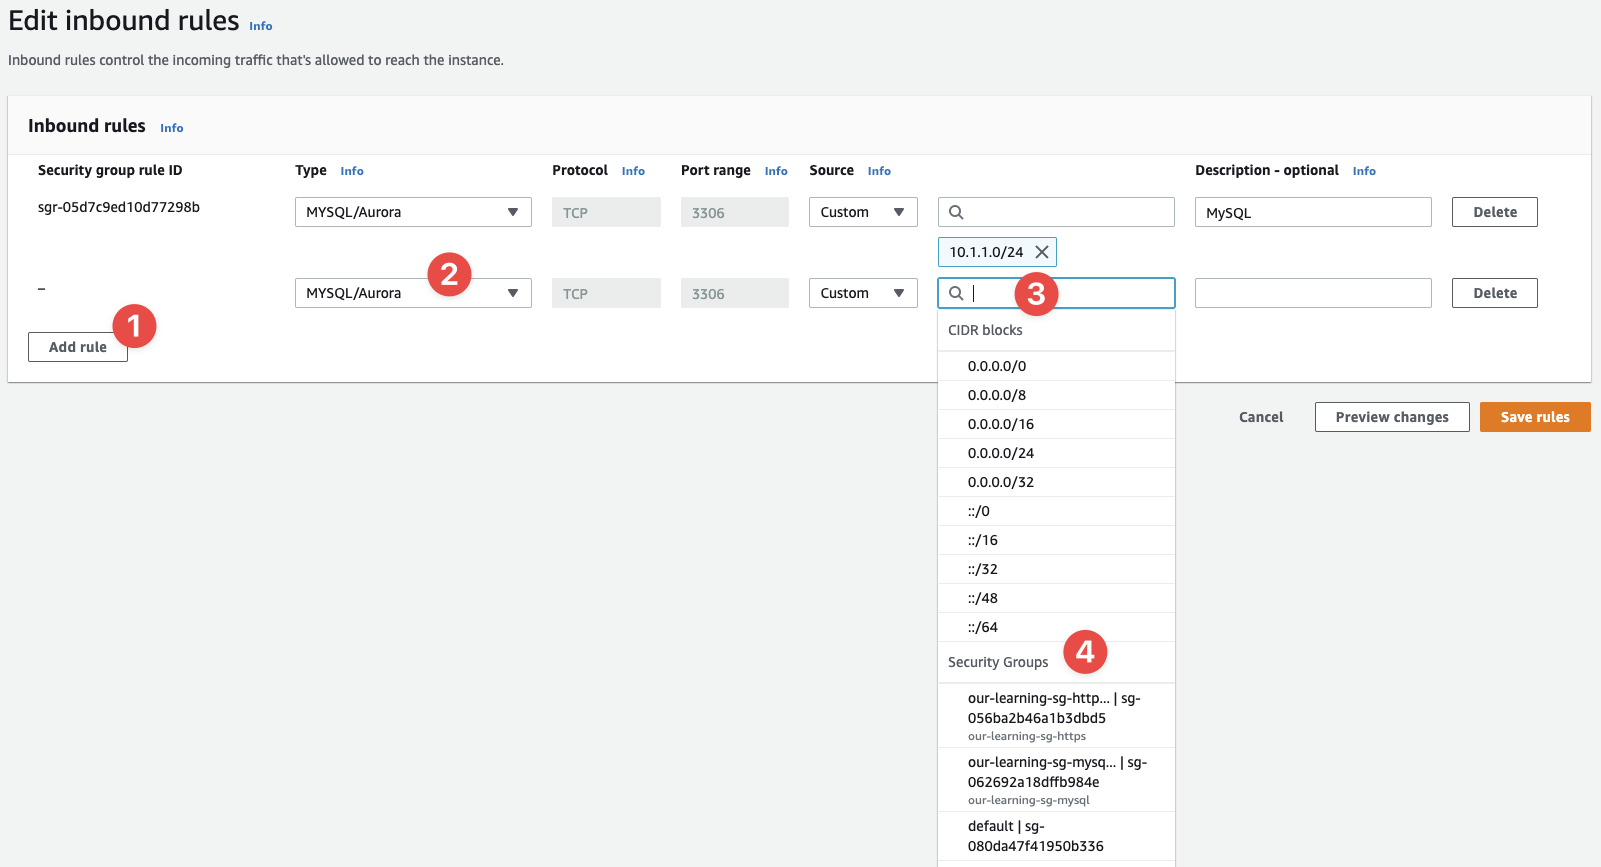
- I clicked on "Add rule"
- Then I selected the "template" for
MySQL/Aurora - In the source field a drop-down appeared
- And look what options we have here: Security Group IDs!
Select the our-learning-sg-https SG ID from the list, give it a description of "MySQL":
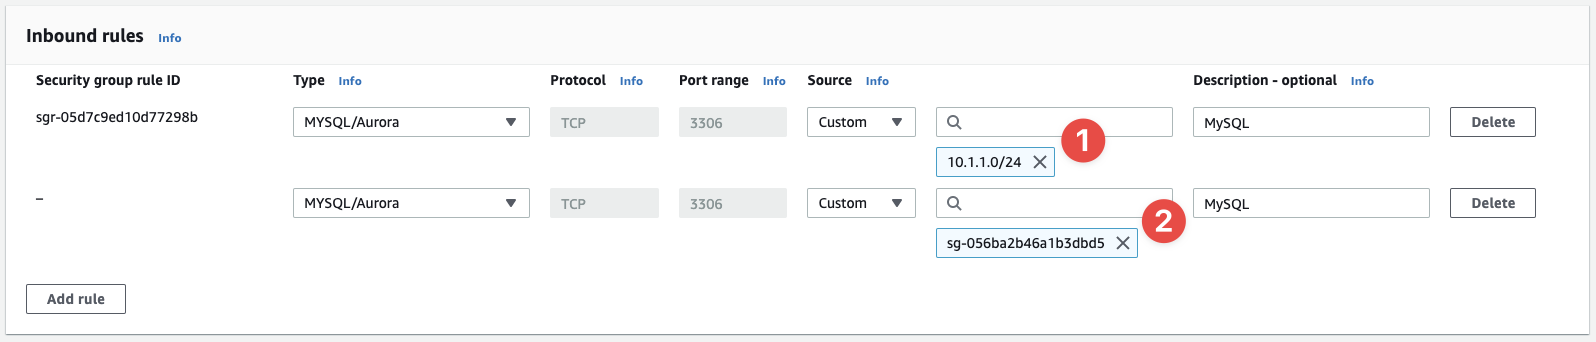
- This is our original rule
- And this is the new rule
These two rules are identical at this point in time. The reason this works is because the SG our-learning-sg-mysql permits TCP/3306 access if it's coming from a resource that has the our-learning-sg-https SG attached to it. Because we know we've attached the latter SG to our App Servers, and they're in subnet 10.1.1.0/24, these two rules are identical. That means you could delete the subnet CIDR rule and just leave the SG-based rule in place and the traffic flow would still work as expected.
This is a powerful feature because it means you can abstract away CIDR ranges inside of SGs so that you don't have to care about the network architecture at all. Instead, you use SGs to identify a particular resource and permit that resource's connection based on that identity.
Don't worry about saving the new rule as we're going to be deleting all of these resources shortly.
Next#
Once complete, and you're confident you've got a good understanding of SGs, move on to Network Access Control Lists (NACL) next.