Roles#
IAM Users have policies attached to them so that they can perform actions inside your AWS account. An IAM Role is the same sort of thing, known as a Pricipal, but it doesn't have login credentials like a username/password nor API keys - they're reserved for users.
But IAM Roles are heavily used across every AWS account structure on the planet. I can guarantee you that.
You define a role and attach policies to it. Users then assume roles and use the policies attached to it to perform actions inside the account (or across accounts.) This is the exact purpose of roles: they're defined, given permissions, assumed, and used.
And roles aren't only used by human users, they're also used by applications and even AWS services (which can be configured to use a role you define, which is required in some cases.)
From the AWS documentation itself:
Roles can be used by the following:
- An IAM user in the same AWS account as the role
- An IAM user in a different AWS account than the role
- A web service offered by AWS such as Amazon Elastic Compute Cloud (Amazon EC2)
- An external user authenticated by an external identity provider (IdP) service that is compatible with SAML 2.0 or OpenID Connect, or a custom-built identity broker.
You can also attach roles to EC2 Instances and other units of compute, like Lambda Functions, so that they have inherit permission to do things for you. This means any code running on the EC2 Instance or inside the Lambda Function has those same permissions.
You can do a lot with IAM Roles and we'll explore most features in time.
Understanding the connections#
So far, you've been exposed to IAM Users and Policies. Now we're going to fit into place the third piece of the puizzle and explain how IAM Roles bring all of this together.
Let's look at an illustration and then explain the componets we can see:
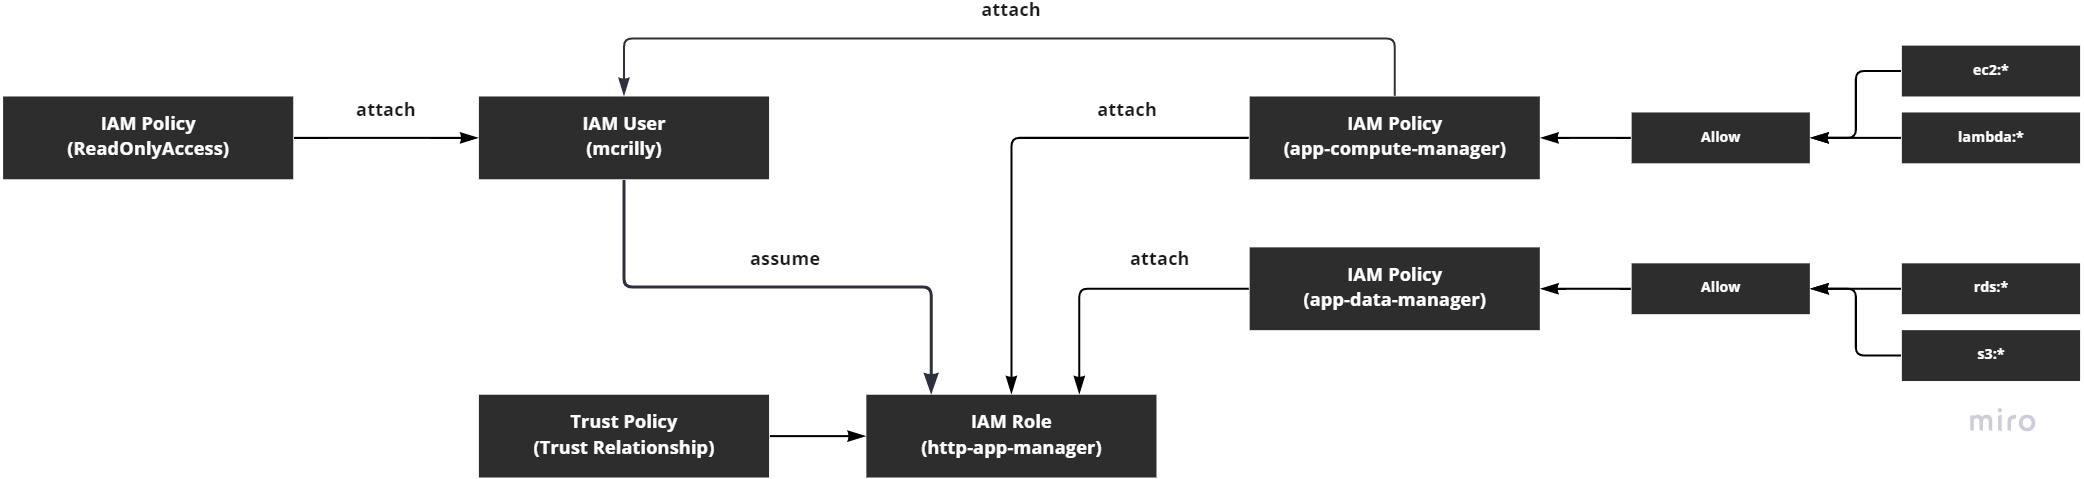

So let's break this down.
In the diagram, we can see some fictional resources (resources we haven't created.) We have a user called mcrilly. We have two policies called app-compute-manager and app-data-manager. And we have a role called http-app-manager.
The two policies are designed to offer write access to various parts of the account. So our fictional user, mcrilly, is able to not only access the whole account via their ReadOnlyAccess role, but they can also perform non-readonly actions because of the app-compute-manager policy that's attached directly to the user.
The role that we have, http-app-manager, is designed to be used by users who want to manage all the resources that are used by our HTTP app (which could be anything at all - we're just making this up right now.) But there's a difference between the user and the role in terms of permissions: the user has read-only access to everything and write access to EC2 and Lambda; whereas the role does not have read-only access to everything and only has write access to EC2, Lambda, RDS, and S3.
So the role has more write permissions than the user, but less read-only permissions.
Trust relationships#
The IAM Role has something else "attached" to it: a trust relationship. This is defining who can assume the role, such as our user mcrilly. You'll see it being referred to as a "trust policy", and it's not the same thing as the IAM Policies you've been writing to define permission. Instead, it's unique to the concept of IAM Roles and definig who can assume the role.
A trust relationship can be written to allow a user inside the same account to assume the role; a user in another account; an AWS service, even one in another account you don't even own; and it can even allow other roles to assume this role (that's called Role Chaining.)
Trust relationships are important and you'll always have to provide one when you create an IAM Role. We'll cover them in more detail during the project work.
Note
IAM Roles are assumed, but IAM Groups have users added to them. So groups are a way of grouping together users who have a need for a common, pre-defined set of permissions. Roles, however, are assumed by a user (or another role), and are temporarily granted the permissions of the role.
Users consume roles#
You'll notice there's a line going from the user to the role with the word "assume" alongside it. An IAM User can assume a role in order to gain access to the permissions attached to the role. Let's visualise that process:
Note
Note that the use of *:ReadOnly doesn't mean anything in AWS/IAM. It's just how I've conceptualised the idea of being able to access any (*) services using read-only (ReadOnly) credentials.
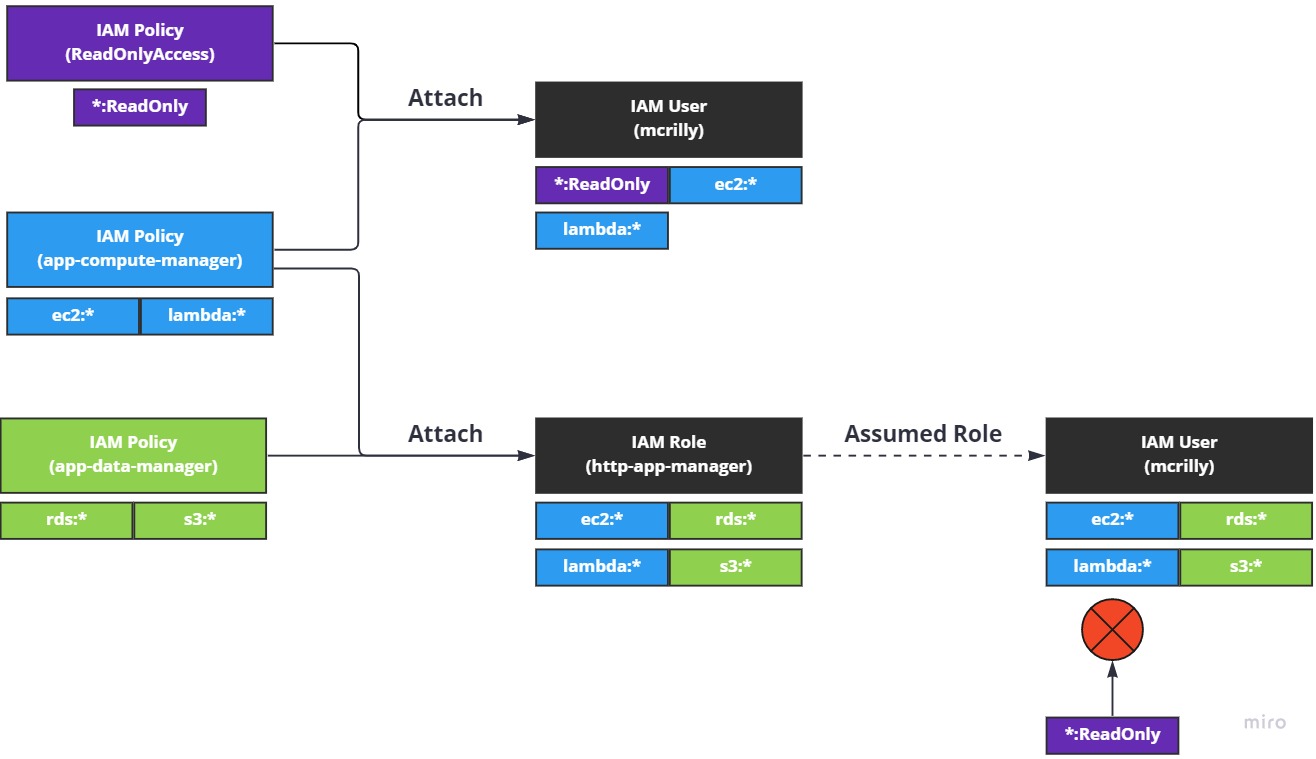
So our three policies are visualised on the left. We can see a simple representation of their permissions underneath them. In the middle we can see our user, mcrilly, and our role, http-app-manager. I've included the aggregated permissions each of thse two principals have based on the policies attached to them.
To the right we can see "Assumed Role", which means the mcrilly IAM User has assumed the IAM Role http-app-manager. Underneath the user, we can now see the new permissions the user has: all the exact same permissions attached to the role, but with a twist.
The user, mcrilly, has all the permissions from the role, http-app-manager, but it lost access to the ReadOnlyAccess (*:ReadOnly) permission. This is an important lesson to learn right now: when a principal assumed a role, their permissions are entirely replaced with the permissions of the role.
To put this another way, assuming a role doesn't mean the role's permissions are added to your existing permissions, they're replaced.
Make sure you understand this otherwise managing and using IAM Roles will be difficult in the future.
Creating a role#
Let's create a role so we can get a better idea of what's going on.
Note
We're going to keep this simple. We want to understand IAM Roles well, but they get complex pretty quickly. Instead of going over everything and getting really deep, we'll cover what we need to know now, at a high level, and cover the deep stuff in our project work.
For this activity, you can just login to your iam-admin user as it can manage IAM for us. Once you're logged in, head over to the IAM service and select "Roles" in the left hande menu:
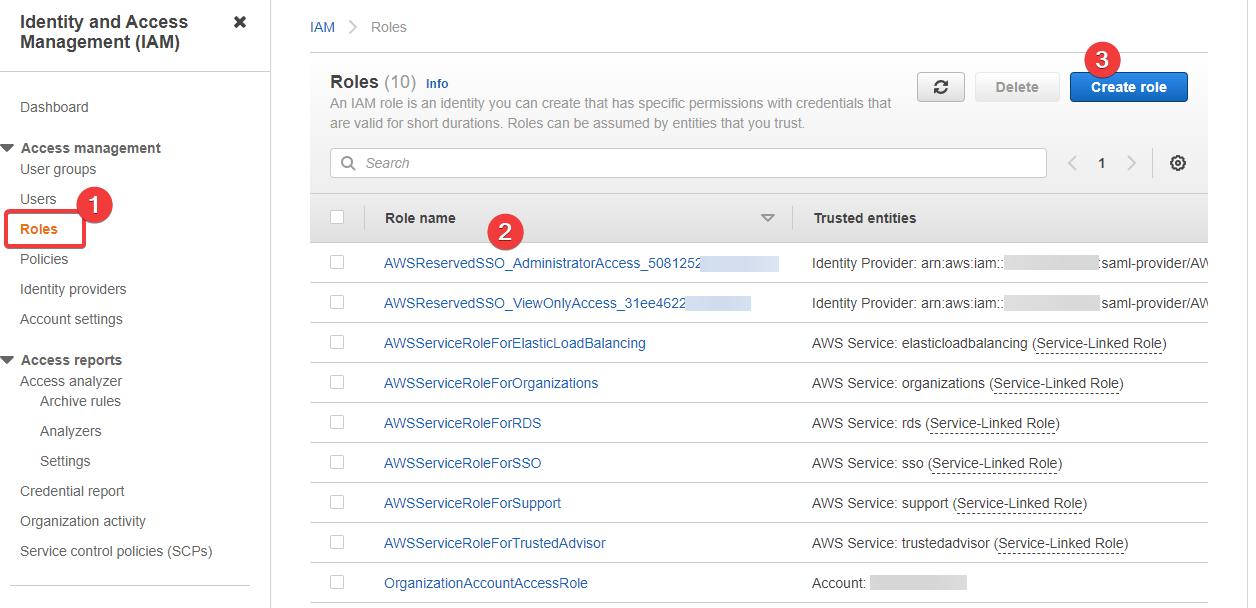
- This is where we access our IAM Roles
- We can see there is a list of existing roles already
- And this is where we begin to create a new role
Note
It's unlikely you'll see AWSReservedSSO_* like Roles in your list. They can be safely ignored.
Let's click 3 - "Create" - and create a new role:
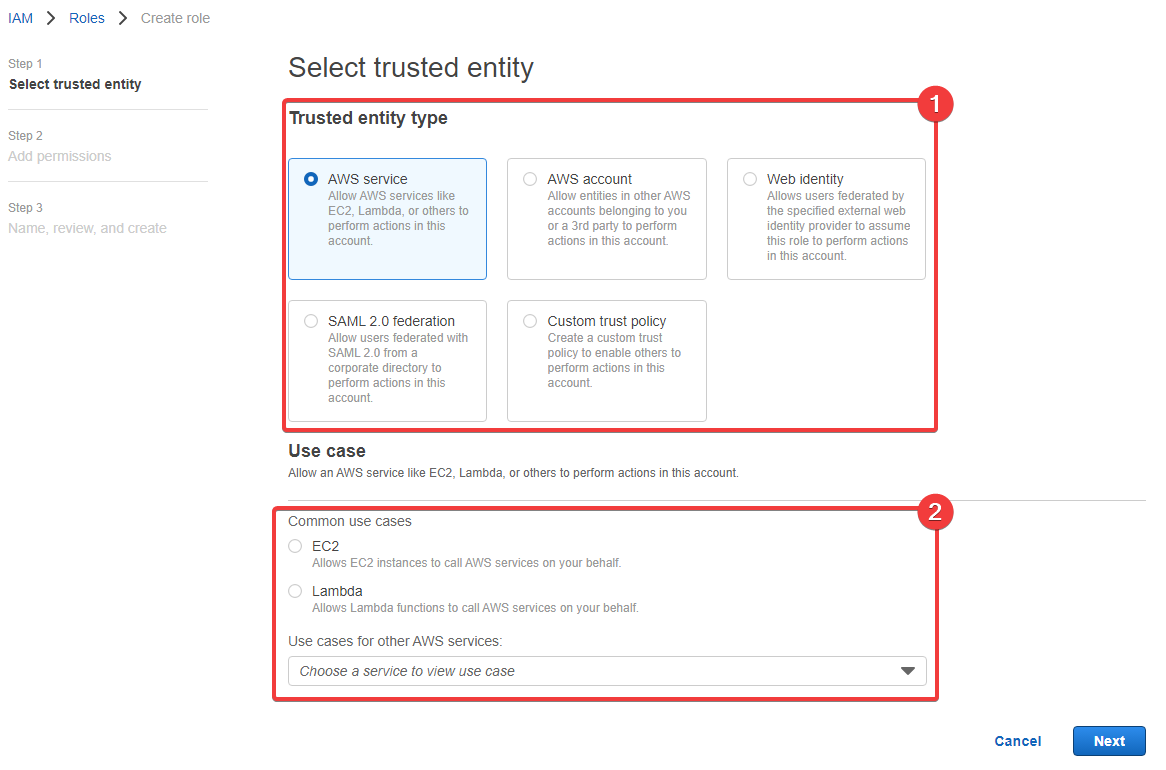
- The trusted entity type is how we define who can assume the role and its permissions - that's what we covered above
- These set of fields change based on the trust entity type you select.
We can see that there are several "Trusted entity type" options in the list:
- AWS service
- AWS account
- Web identity
- SAML 2.0 federation
- Custom trust policy
Some of these are pretty advanced and we won't cover them. Instead, we're going to create a "Custom trust policy" so that we can allow our user - iam-admin - to assume the role and change their permissions.
Select Custom trust policy in the list and you'll see this:
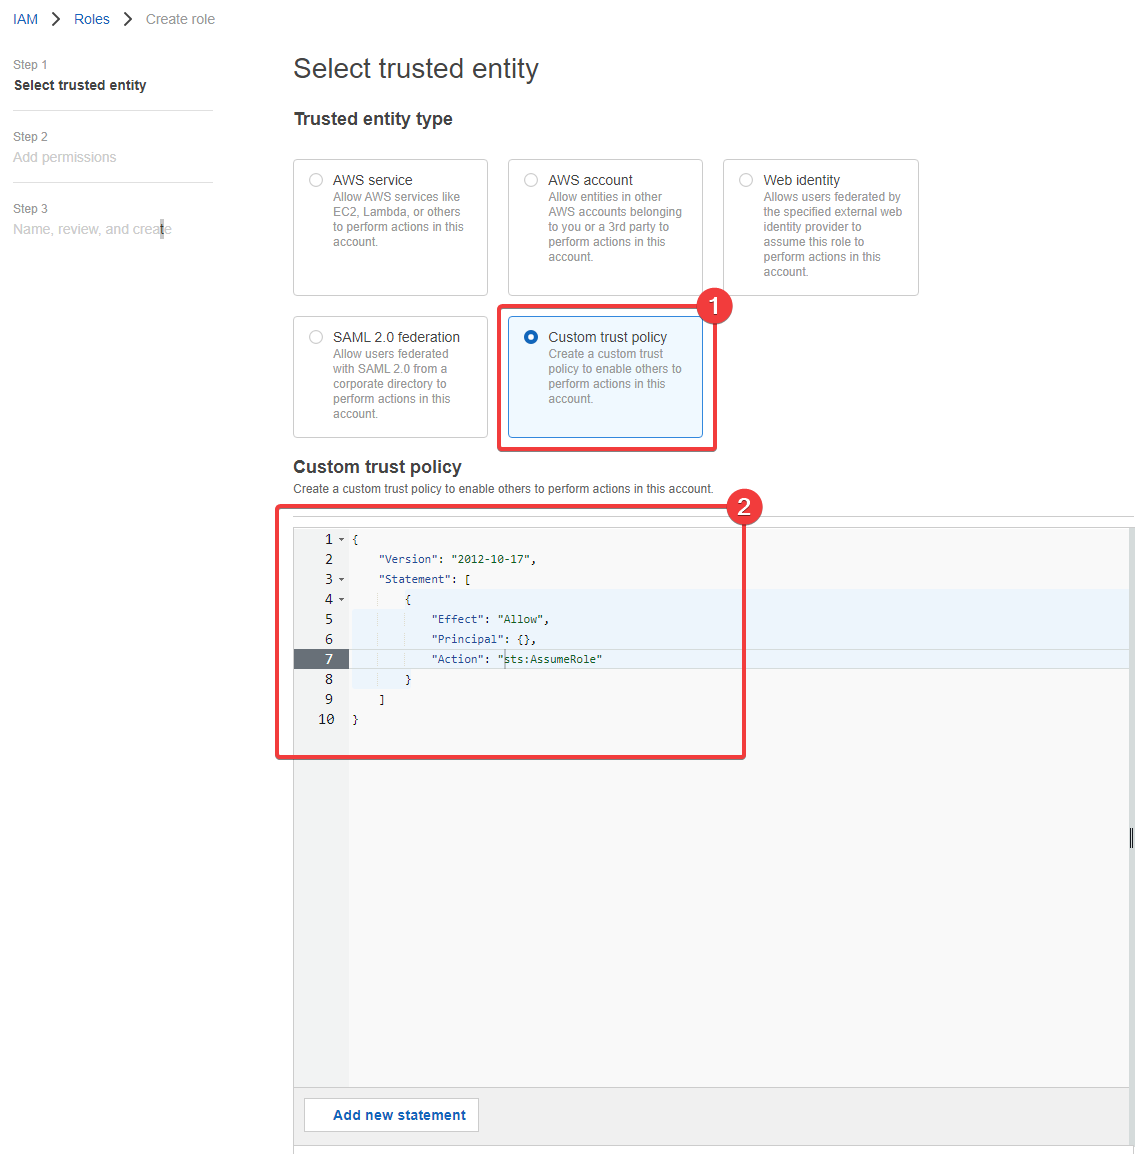
- So now we're selected the "Custom trust policy" type1
- And now we have a trust policy to define
Let's define the trust policy. I'll coming to copy and paste (++cntrl+c++, ++cntrl+v++) the following into the "Custom trust policy" field we can see above:
Warning
You must replace <myaccountnumber> with your AWS account number, otherwise what we have below will not work.
1 2 3 4 5 6 7 8 9 10 11 12 | |
This entire trust policy is attached to the role and tells it that the items in the the Principal field are allowed to assume this role and are granted its permissions. The trust policy does not define the permissions the role has. That's what we do on the next screen by attaching policies.
So click "Next" and we'll be able to attach some permissions to the role. I'm going to attach the ReadOnlyAccess policy to my new role:
Note
The ReadOnlyAccess policy was on the second page of the list for me. It might be different for you, so make sure you look carefully.
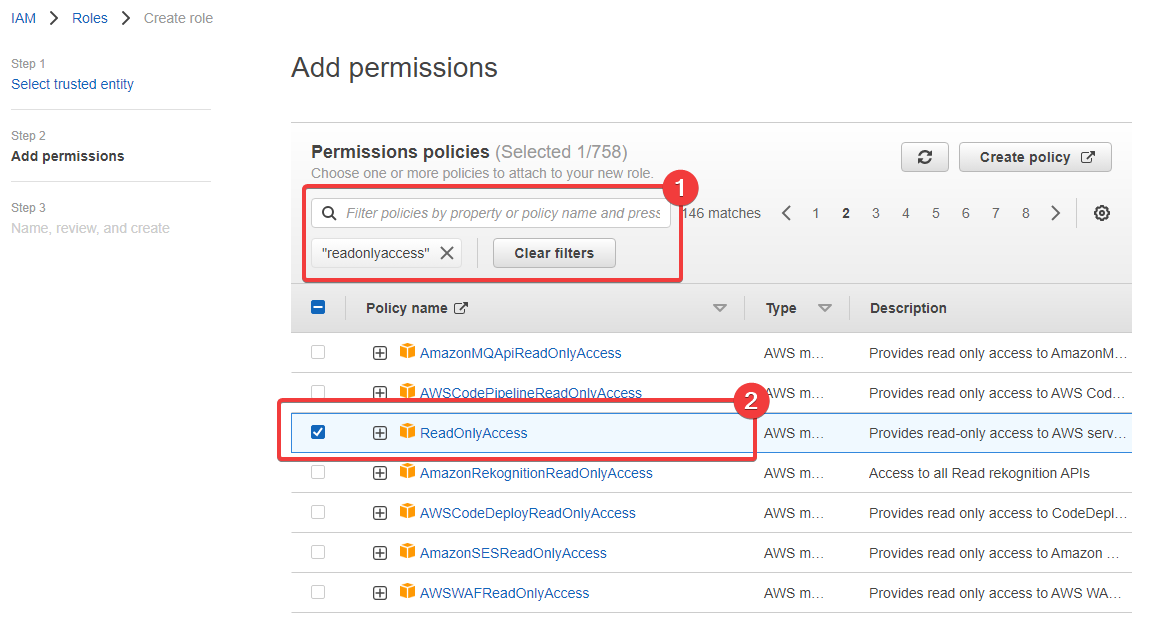
- I typed
readonlyaccessinto the search field and hit Enter - And here we can see the
ReadOnlyAccessrole in the list (on page 2 for me)
At the bottom of this page we're on - "Step 2: Add permissions" - there's a section titled, "Set permissions boundary - optional". Ignore it. I've never had a need to create or define a permissioins boundary, so although they have their place and they're a valid feature, they're simply not something you need to care about right now.
Click "Next".
Now we're at the final stage. This is where we see a summary of the role's trust policy and the permissions, but also where we define the name, the description, tags and even where we can change some of those things too. Here's what the final form looks like for me:
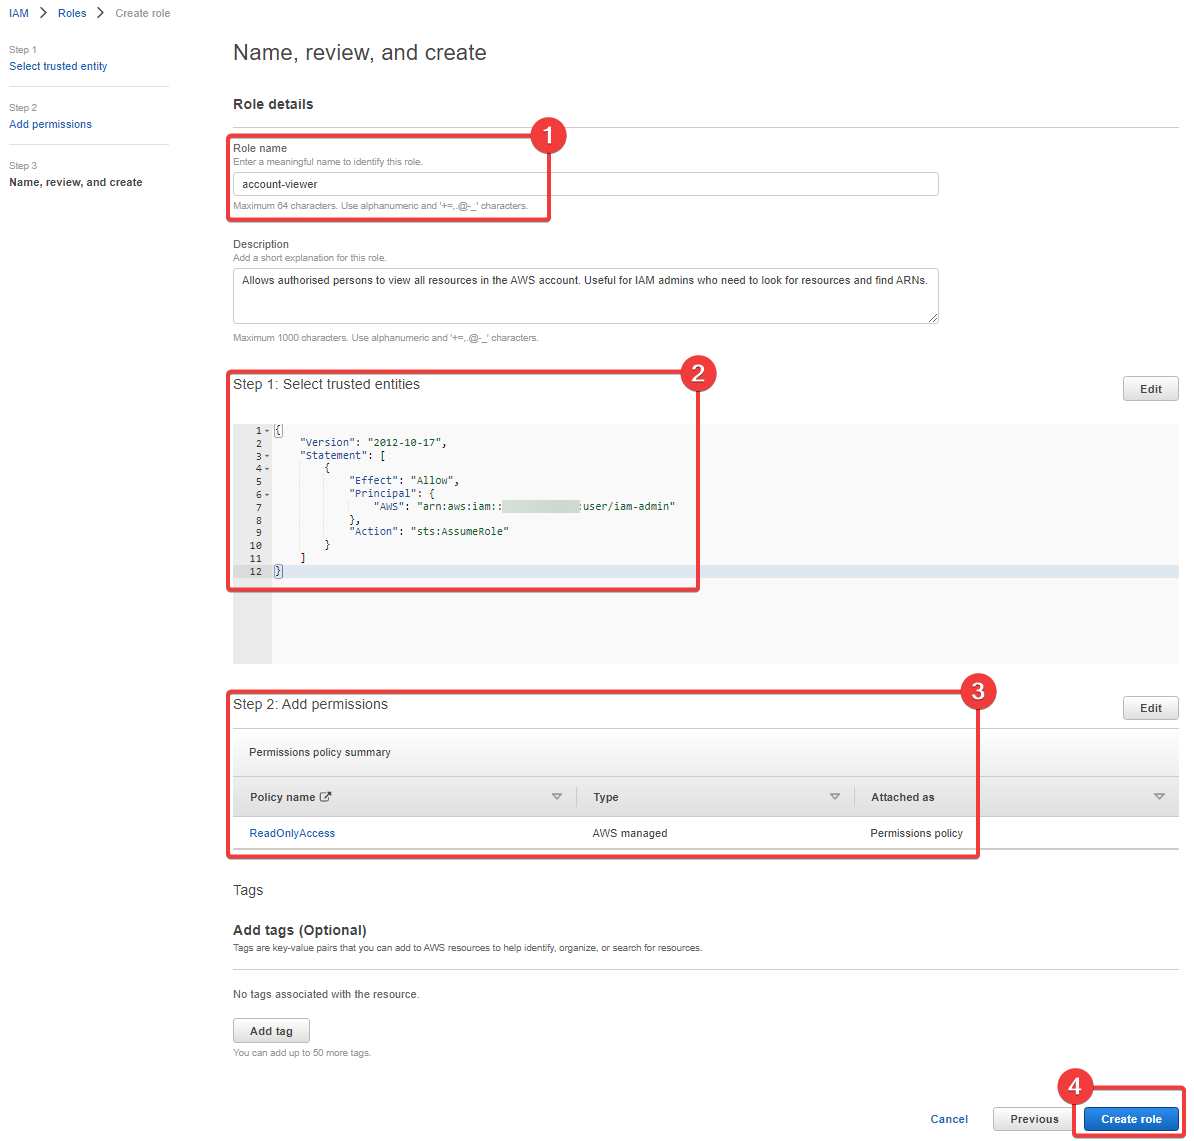
- I've called the role
account-viewer; I've defined a simple description too - We can see our trust poliy here, which allows the
iam-adminuser to assume the role - These are the permissions we've granted the role
- And finally, we create the role
Eventually the role goes into your account's list of roles and we can view the details of it.
Viewing the details#
Let's open up the role and look at the detailed view:
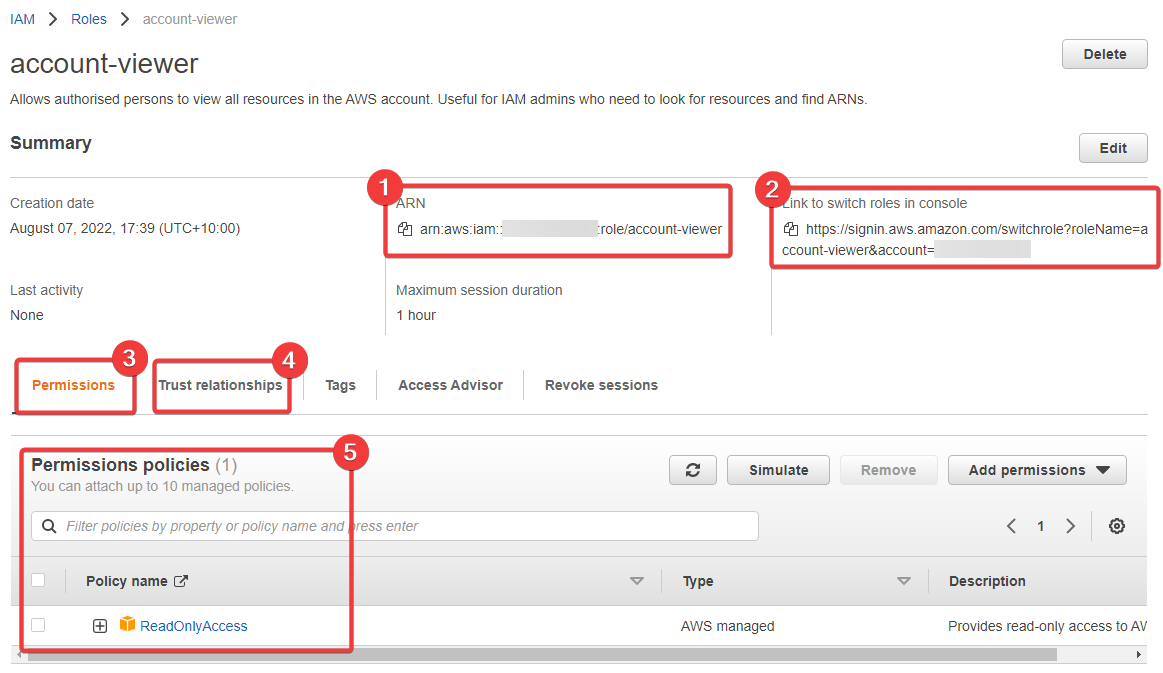
- The ARN of our role. Useful to know where this is
- This link is interesting - we're going to use this shortly
- Here we define the permissions for our role
- And here we define the trust relationship
- And finally we have the current permissions attached to the role
At this point in time, a lot of what we're seeing here should be clear to you, but the link in 2 is what's new to you and we'll explore this next.
Assume the role#
Here's my link: https://signin.aws.amazon.com/switchrole?roleName=account-viewer&account=<youraccountnumber>
Warning
You have to replace <youraccountnumber> with your AWS account number.
In another tab inside the same browser you're currently using, open the link. This is going to take you back to the AWS signin page and pre-fill some details in for you. This is a special signin page used for switching roles. You'll use this often in some environments.
Here's my result:

- This is your account number - the account that the IAM Role is inside of; where the IAM Role was created (which account owns it)
- This is the name of the role -
account-viewer- and it's the role we created earlier - These are details you can overlook, or fill in - we'll cover these below
- And this triggers the switching of the role
The "Display Name" and "Color" are used later on, after you've switched role. We'll see this shortly. Click "Switch Role"
Now something interesting as happened. You'll have been taken back to the "Console Home", and your username in the top-right will have changed. Here's what I see:
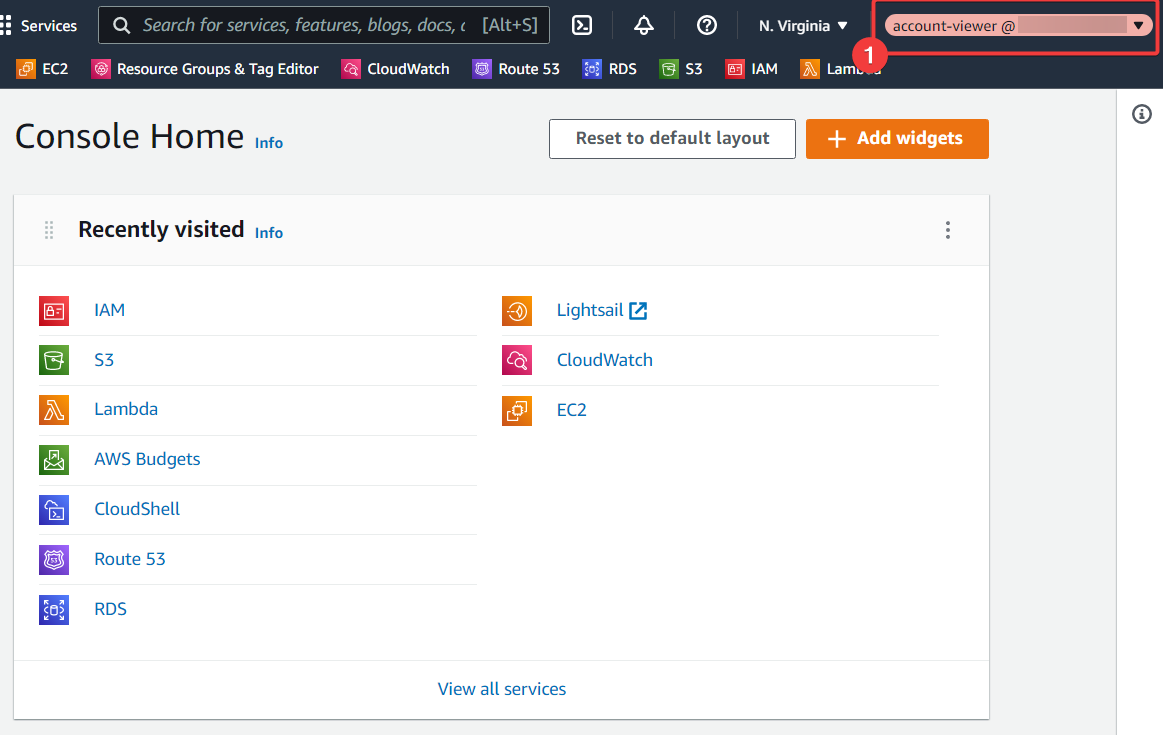
- We can see the username is set to
account-viewer @ <your-aws-account>
This is AWS' way of telling you that the role you're currently using is called account-viewer and it's present in a particular AWS account. If you click on this, you'll get a sub-menu that has some interesting details in it:
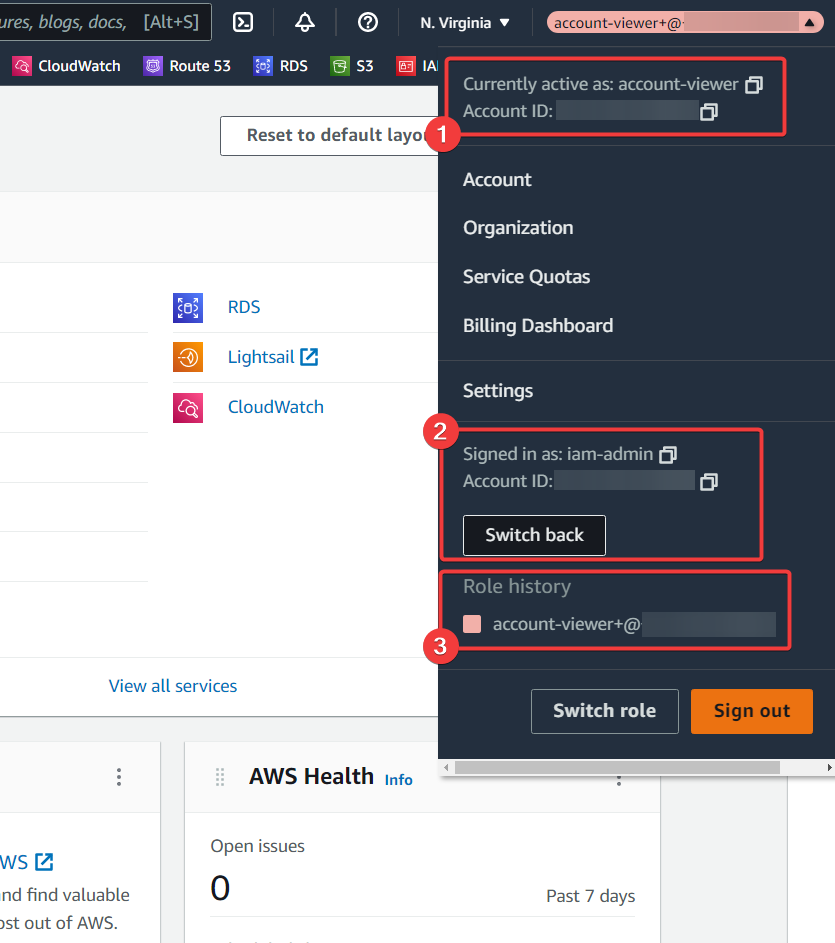
- We can see we're currently active as the
account-viewrole in an "Account ID:" - But here we can see our original username,
iam-admin, and the account ID you've come from - And this is where the "Display name" and "Color" come into play: they make it easier to switch back between roles later on
Now move around the AWS console, visiting various services, like EC2, and you'll see that you're not getting a bunch of API errors due to a lack of permissions. Now you can actually see things, but you can't edit to create anything. The role is working.
Click on "Switch back", and you shouldn't be surprised to find your back in your AWS account, but logged in as iam-admin now. Now we're going to change the trust policy on the role.
Let's untrust ourselves#
Let's have a bit of fun. Let's lock ourselves out of the role. Head over to IAM and then Roles. Then select the role in the list - account-view - and select the "Trust relationships" tab. This is what you should see (minuse a few minor differences):
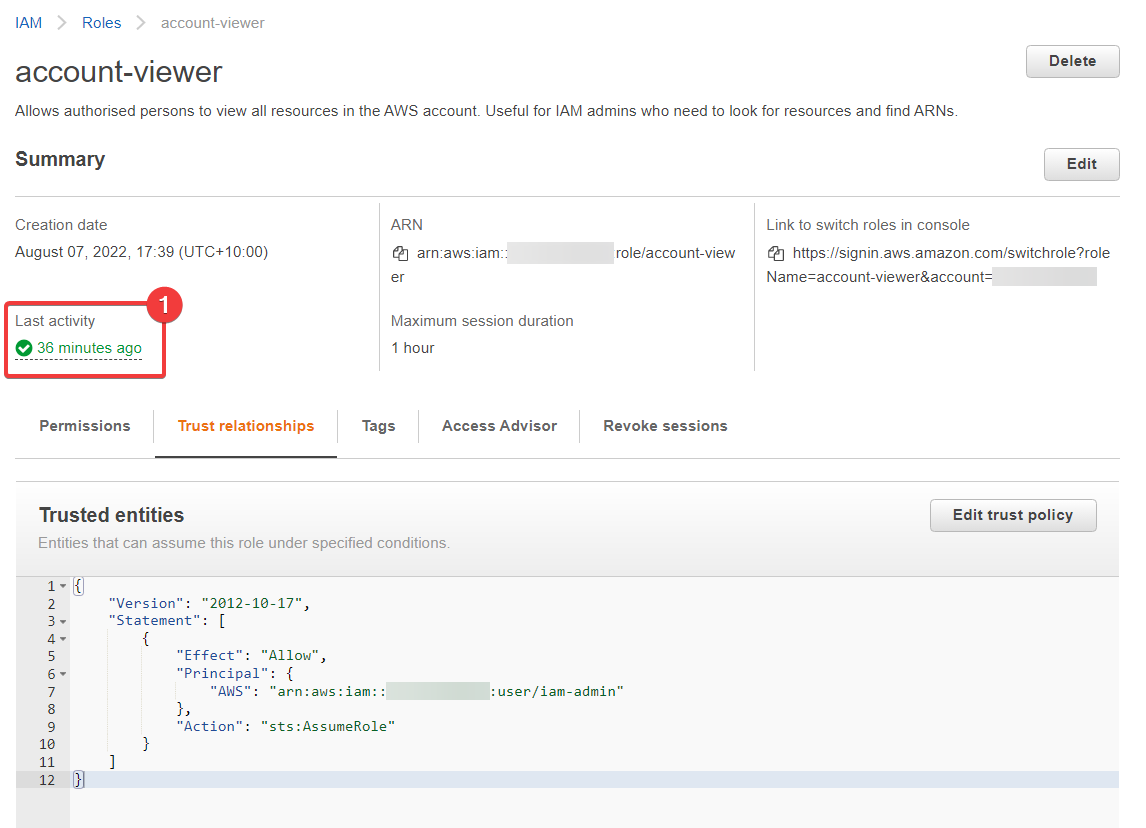
- It's worth noting that we can see the role was used "36 minutes ago" (by me, of course) - this can be useful at times
Now we're going to change the JSON document inside of "Trusted entities". Click on "Edit trust policy" (just above the JSON, to the right.) Here's what I'm changing it to:
1 2 3 4 5 6 7 8 9 10 11 12 | |
Notice that I've changed the Allow to Deny. Save this, and then try to assume the role again. It won't work, and I think you know why. Try it and see.
That's the basics of roles, but we'll most certainly be coming back to them a lot once we hit project work.